Creating or Editing a Checklist Template
Checklist templates define the structure, layout, and questions used during on-site assessments. When properly designed, checklists can greatly simplify the assessment process and preparation of final reports.
Checklist requirements and observations can flow directly into the Findings section of the assessment and into final reports, reducing duplicate data entry and improving consistency.
Checklist templates are used only for assessments that include an on-site evaluation. Checklists can be completed using any web-connected desktop, laptop, or tablet.
Checklist Templates and Assessment Findings
Each checklist question represents a requirement, observation, or informational item that may result in:
- A compliant observation
- A nonconformance or finding
- A note or comment for the final report
When assessors record responses and observations in a checklist, those results can be reviewed, edited, and promoted to findings as part of the assessment reporting workflow. Well-structured checklist templates help ensure findings are complete, consistent, and clearly traceable to specific requirements.
Template Requirements
A checklist template defines the content that will be used across all checklists created from that template. Templates can be developed to cover any aspect of an on-site assessment, including high-level quality system requirements or detailed method-specific requirements.
Common examples include:
- TNI 2016 V1M2 – General Management Requirements
- SM 4500-H+ B-2011 – pH by ISE
- Sample Receiving Requirements
Templates are created and maintained outside of AB Manager using a comma-separated value (CSV) file and then uploaded into the system.
Templates may be created or edited using any CSV editor, such as Microsoft Excel or similar spreadsheet software. Files must be saved in .csv format.
CSV File Structure
The format, headers, questions, and other checklist content are defined entirely by the CSV file.
Important:
All fields in the CSV template must be spelled correctly and are case sensitive.
Required Column Headers
The first row of the CSV file must contain the following column headers exactly as shown:
TypeTextOption
Template Identification Rows
The next rows of the CSV file are used to define the checklist template metadata:
title: Example — “SM 4500-H+ B-2011 (pH by ISE)”description: Example — “pH Value by Electrometric Method”createdate: Example — “1/19/2023”createdby: Example — “KS/AQS”notes: Example — “Based on xyz method”
Checklist Content Rows
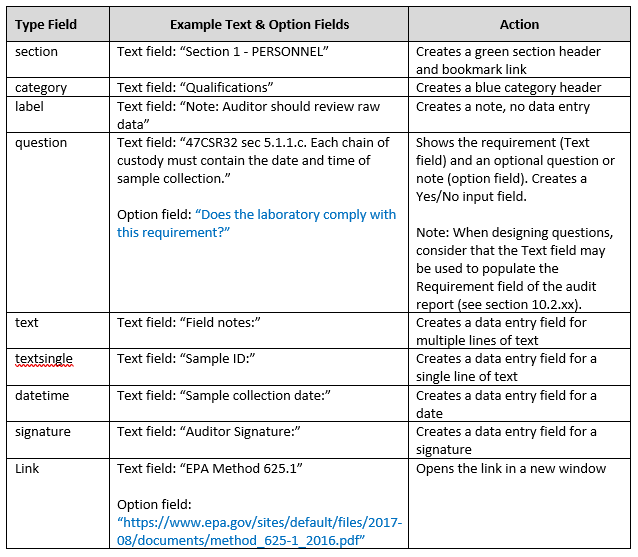
All subsequent rows are used to design and populate the checklist itself. These rows may define:
- Sections and categories
- Labels and instructional text
- Questions and response options
- Date fields, signatures, or links
Each row type is controlled by values entered in the Type, Text, and Option columns, as outlined in the checklist template reference table.
Saving and Uploading the Template
When finished:
- Save the file as a CSV (comma delimited) file
- Ensure the file name is unique (for example, “Generic Checklist – Revision 5”)
- Upload the CSV file into AB Manager as a new or updated checklist template
Once uploaded, the template can be used to create checklists for applicable on-site assessments.